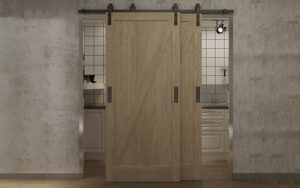
Barn doors are a popular interior design trend that brings rustic charm and open floor plans to modern homes. Their sliding door design allows them to take up minimal space while opening, maximizing usable area. However, installing a sliding barn door takes more planning and steps than a standard swinging door. If you’re ready to upgrade an interior doorway with the character and style of a barn door but aren’t sure where to start, this step-by-step guide will walk you through the entire installation process.

From selecting the right door and hardware to measuring, hanging, and adjusting, installing barn doors correctly requires careful work. In this article, you will learn how to install a barn door by yourself. We’ll cover choosing the right door type and materials for your space, laying out a detailed plan, hanging and attaching the door and the barn door track hardware, adjusting the rollers, and making any finishing touches.
With some basic tools and carpentry skills, you can transform a standard doorway into an on-trend barn door entrance. Let’s get started on this stylish and space-saving home upgrade!
Preparing for Installation of Barn Door
Before you embark on the journey of hanging a barn door, you’ll need to make some foundational decisions about the door itself and gather the necessary tools and measurements to ensure a successful installation.
Choosing the Right Door
When selecting your barn door, consider the style, material, and size to ensure you have enough space to meet the aesthetic and functional demands. The door should be wider than the doorway opening to provide complete coverage when closed. Typically, you’ll want a door that extends at least 2 inches beyond the door opening on all sides.
Gathering Your Tools
To install your barn door, you’ll need the following tools:
- Tape measure: Essential for accurate measurements.
- Level: To ensure your door hangs straight.
- Stud finder: Vital for locating studs in the wall to securely attach the track.
- Drill with bits appropriate for your wall material.
- Hardware kit: Contains necessary items like mounting tracks, rollers, stoppers, and screws.
Measuring Your Doorway
Proper measurements are crucial. Using a tape measure, determine the doorway width and height. For the track to fit correctly, you should measure the space above the door, allowing for the hardware which typically requires around 6 to 8 inches of clearance. Here’s a brief guide:
- Door Width: Measure the width of the doorway and add at least 4 inches to determine the minimum width of your barn door.
- Door Height: Measure from the floor to the top of the doorway and add approximately 1 inch to determine the door height. This ensures it doesn’t drag on the floor.
- Wall Space: Check for enough wall space on either side of the doorway for the door to slide open.
This preliminary groundwork will lay the framework for a smoothly running barn door in your home.
How to Set Up the Hardware

To properly install the door by yourself, it’s important to carefully select the right hardware and door and ensure the track is securely and accurately attached to your wall. Let’s get started with the process of setting everything up.
Selecting Barn Door Hardware
The first step is to choose the appropriate barn door hardware kit. Make sure it includes straight strap mounts which will hold the weight of your sliding barn door. Your kit should typically come with a metal track, wall spacers, lag bolts, washers, and door stoppers. Choose hardware that can sustain the weight of your door and match the aesthetic of your space.
Attaching the Track to the Wall
Before you start, use a stud finder to locate the wall studs where the track will be mounted. This ensures your hardware will be securely fastened. If no studs are in the desired locations, you must install a mounting board or backer board first.
- Install the track directly on the wall at the desired height.
- Mark the holes for your lag bolts using a speed square to ensure they are level.
- Pre-drill holes using a cordless drill with a bit slightly smaller than your lag bolts.
- Install the track with the holes you drilled in the backer board.
Ensuring Level and Aligned Track Installation
For the track to function properly, it must be perfectly level and aligned.
- Place a level atop the track. If the bubble isn’t centered, adjust the track until it is.
- Use the pre-drilled holes to secure the track to the wall with lag bolts, and use a hammer to tap in any spacers.
- Tighten all bolts with a cordless drill or screwdriver, but don’t overtighten, which could strip the holes.
By following these steps meticulously, you’ll ensure your barn door operates smoothly and safely.
Installing the Door
Before hanging your barn door, ensure you have all the necessary components from your barn door kit, including hangers and stoppers. The integrity of your installation relies on precise mounting and secure attachment of the rollers and stoppers to ensure smooth operation.
Mounting the Door to the Hangers
- Align the Door Hangers: Determine the placement of the strap hangers on the door itself. They should be equidistant from the top edge of the door for a balanced look.
- Attach Hangers: Using the wood screws provided in your door kit, fasten the hangers to the door at the markings you’ve made. Double-check that they are level and properly aligned.
Attaching Rollers and Stopper
- Positioning Rollers: Slide the rollers onto the track before lifting your door to prevent any need for re-adjustment later on.
- Lifting and Fastening: Carefully lift the door and position the rollers into the track. You might need an extra pair of hands for safety and ease.
- Secure with Stoppers: Once the door is in place, attach the door stoppers at each end of the track. Tighten them firmly so that the door doesn’t slide off the track when in motion. Use the hex key from your barn door kit to secure these elements into place.
Fine-Tuning for Functionality
Once you have your barn door installed, it’s important to make adjustments to ensure it operates smoothly and securely. This involves installing and setting door guides and locks, along with adjusting the hardware for optimal performance.
Adjusting for Smooth Operation
To ensure your barn door glides easily, check all the hardware connections first. If your door isn’t rolling smoothly:
- Tighten any loose lag screws with a wrench, but don’t overtighten.
- Use a level to ensure the track is perfectly horizontal.
- If your door sticks or wobbles, adjust the mounting hardware. This may involve loosening the bolts, shifting the position slightly, and then retightening.
Anti-jump discs are small but crucial for functionality, preventing your door from jumping off the track:
- Slide the discs onto the top of the door, one on each end.
- Secure them with screws pre-drilled with a smaller drill bit than your screw to avoid splitting the wood.
Confirm that the door rolls back and forth without any obstacles. It should stay on track and not swing away from the wall or catch on the floor.
Installing Door Guides and Locks
Door guides keep your door from swinging and maintain its path in line with the track. Here’s how to install them:
- Position the floor guide centered beneath the door when it’s closed.
- Mark the screw holes, then predrill to avoid splitting your floor.
- Secure the guide with screws provided in your hardware kit.
For privacy or to keep the door stationary, you’ll want to install a lock:
- Choose a lock suitable for a barn door, typically a hook and eye or a sliding bolt.
- Align the lock and door handle at a convenient height.
- Mark the handle position and predrill.
- Install the handle using the screws from your hardware kit, ensuring it’s tight and functional.
Adding Finishing Touches
After you’ve installed your barn door, adding the right finishing touches ensures that it not only functions well but also complements your home’s style and decor.
Painting or Staining Your Barn Door
Choosing Your Finish:
- If you’re aiming for a rustic look, staining your barn door can enhance the natural grain of the wood. Choose a stain that matches the mood and style of your space.
- For a more tailored appearance or to match other colors in your location, opt for paint. Select a high-quality paint that will withstand the movement and use of a barn door.
Application:
- Painting: Apply a primer before your chosen color to ensure even coverage and long-lasting durability. Let each coat dry thoroughly.
- Staining: Use a rag or brush to apply your stain evenly, and consider sealing it with a clear coat for added protection.
Fitting Handles and Pulls
Selecting the Right Hardware:
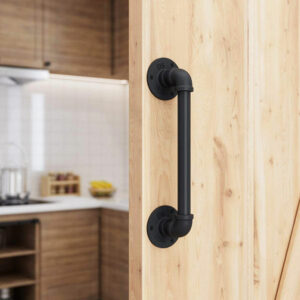
- Your choice of handle or pull should merge functionality with aesthetics. Consider recessed pulls for a more streamlined look or bold handles that make a statement.
Installation:
- Tools: You’ll need a drill, screws, and possibly a chisel if you’re installing recessed hardware.
- Fitting: If you’re attaching handles, mark the screw holes, drill pilot holes, and secure the hardware with screws. For pulls, ensure that they’re level before drilling.
Remember to measure twice and install once to avoid any unnecessary holes or adjustments that could detract from your door’s appearance.
Enhancing the Aesthetics
Selecting the right barn door incorporates both function and style. It’s about choosing an option that complements your home’s decor while serving as a striking focal point or a subtle backdrop to your space.
Choosing a Style to Complement Your Space
When you’re deciding on the style of your barn door, consider the existing elements of the room. A barn door isn’t just a functional interior door; it’s a statement piece that can enhance the character of your living room, kitchen, or bathroom. Here’s how to choose a style:
- Living Room: For a relaxed yet sophisticated ambiance, consider a rustic wood door with matching hardware. It can serve as a dynamic counterpoint to a traditionally styled room or add warmth to a modern setting.
- Kitchen: A chalkboard barn door can be both a playful and practical addition to your kitchen, doubling as a space for grocery lists or family messages.
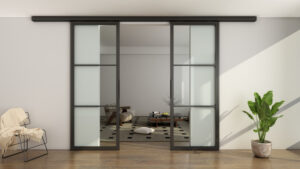
- Bathrooms: Opt for a door with frosted glass panels to maintain privacy while letting light filter through. It adds a modern touch and gives the illusion of space in smaller bathrooms.
- Space-Saving: In all rooms, the sliding mechanism of barn doors makes them an ideal space-saving solution. By bypassing the swing radius required by regular doors, you free up precious floor space.
Choose materials and designs that resonate with your personal style and the function of the room. Whether it is a stately double Z door for an elegant look or a half X door for a more casual approach, your barn door can elevate the interior design of any room it occupies.
Maintenance and Care of Barn Door
Regular Cleaning and Upkeep
- Dusting: Use a microfiber cloth to gently remove dust from the door’s surface. Doing this bi-weekly can prevent buildup that might impair the door’s movement or finish.
- Cleaning: For the door itself, if it’s made of wood, use a wood cleaner and soft cloth to avoid damaging the finish. Glass panels can be kept clean with a simple solution of vinegar and water.
- Hardware Care: Metal components like tracks and rollers should be wiped down with a damp cloth and, if necessary, a non-corrosive cleaner. Always dry metal parts to prevent rust.
- Lubrication: Every few months, lubricate the track and rollers with a silicone-based lubricant to keep the door sliding smoothly.
Troubleshooting Common Issues
- Sticking: If your door sticks, check the track for debris and clear it out. Ensure screws are tight and the track is straight.
- Noise: Squeaking or grinding can usually be remedied with lubrication. Apply a silicone-based lubricant to the track and rollers.
- Alignment: If the door seems uneven, verify that the mounting hardware is properly tightened and aligned. Minor adjustments can make a big difference.
Frequently Asked Questions
In this section, you’ll find concise answers to common questions to guide you through the process of installing a barn door.
What steps should I follow to hang a double barn door?
To hang a double barn door, start by measuring the door opening and ensure you have adequate wall space beside the opening for the doors to slide open. Mount a track above the opening, hang the doors with the provided hardware, and ensure they’re balanced and roll smoothly.
Can I install a barn door if my room has carpeted floors?
Yes, you can install a barn door with carpeted floors. The door hangs above the floor, so the carpet doesn’t affect the operation. Ensure the door is high enough to clear the carpet pile without dragging.
Do I need a header board to mount a barn door or can I mount it without one?
A header board is recommended to mount a barn door, especially if your wall doesn’t have sufficient support where the track will be installed. The board allows for a more secure track installation by distributing the door’s weight across the studs.
Is a bottom track necessary for a barn door to function properly?
A bottom track isn’t essential; however, a guide must be used at the floor level to prevent the door from swinging. If you prefer a clean look, opt for a wall-mounted guide that allows the door to slide without a track on the floor.
How much larger should the barn door be than the actual opening?
Typically, a barn door should be at least 2 inches wider and 1 inch taller than the door opening to ensure adequate coverage and to minimize gaps.
Are there any cost-effective tips for DIY barn door installation?
Yes, to save costs on your barn door installation, consider using repurposed materials or hardware and look for simple designs that can be easier to install. Planning and precise measurements can prevent expensive mistakes.


