A ceiling mount barn door room divider lets you create flexible living areas without needing wall support, making it perfect for open floor plans, doorways with limited wall space, or anywhere you want to add privacy without permanent walls.
This setup works great when you need to separate a bedroom from a living area, close off a home office, or add privacy to a closet. You’ll learn how to choose the right hardware, install it properly, and keep everything running smoothly.
Ceiling Mount Barn Door Room Divider Basics
Ceiling mount barn door room dividers attach to your ceiling instead of your wall, giving you a flexible way to separate spaces while keeping your walls free for other uses.
What Is a Ceiling Mount Barn Door Room Divider?
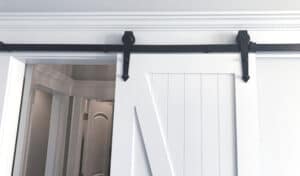
A ceiling mount barn door room divider hangs from a track attached directly to your ceiling. The door slides along this overhead track using special rollers mounted at the top of the door. A small floor guide keeps the bottom stable as it moves.
This setup works differently than wall-mounted barn doors. The track bolts into your ceiling joists or a support board between joists. You can use wood, glass, or metal doors with this system.
Benefits of Ceiling-Mounted Room Dividers
You get more wall space for furniture, windows, or artwork since the track sits overhead. The door creates a floating look that makes rooms feel more open.
Glass doors let light pass through while dividing spaces. You can slide the door open when you want one big room or close it for privacy.
When to Use a Ceiling Mount Installation
Pick ceiling mount when your walls have switches, windows, or decorations where a wall track won’t fit. It works well in open floor plans where you need temporary room separation.
Selecting the Right Ceiling Mount Barn Door Hardware
Choosing the right ceiling mount barn door hardware kit depends on your door weight, thickness, track style, and whether you need a single or bypass setup.
Types of Ceiling Mount Barn Door Hardware Kits
You’ll find two main styles. The low-profile kit mounts the track close to the ceiling with hangers attached directly to the door. This style works great when you need maximum headroom.
The box-style enclosed track hides the rollers inside a housing. It sits a few inches below the ceiling but gives you a clean, built-in look. Box kits often handle heavier doors—up to 300 lbs—while low-profile systems typically support up to 180 lbs per door.
How to Choose the Best Hardware for Your Space
Start by measuring your door thickness and weight. Most kits fit doors between 1⅜″ and 2″ thick.
Check your ceiling structure. You need solid framing or blocking to support the load safely. Measure the opening width plus slide-clearance so the door can fully open.
Floor Guides and Glide Systems Explained
A floor guide keeps your door from swinging. It mounts to the floor and holds the bottom edge in place without locking it. Some kits include a guide; others require a separate purchase to match your hardware.
Installation and Design Considerations
Installing a barn door room divider with ceiling mount hardware requires careful planning to ensure proper support and achieve your desired style. You’ll need to measure your space accurately, confirm your ceiling can handle the weight, and choose a design that matches your home’s aesthetic.
Measuring and Preparing Your Space
You need to measure the width of your opening plus additional space for the door to slide open completely. The door should be wider than the opening by at least a few inches on each side for privacy.
Measure the ceiling height to determine your door size. Most ceiling-mounted systems need about 2-3 inches of clearance between the door top and ceiling for the hardware. Check for any light fixtures, vents, or ceiling fans that might interfere with the door’s path.
Mark where you want the door to stop on both sides. This helps you plan the track length for your ceiling mount barn door hardware.
Ceiling Structure and Support Requirements
Your ceiling must support the door’s weight, which can range from 50 to 200+ pounds depending on the material. The track must attach directly to ceiling joists or a reinforced header board.
Use a stud finder to locate ceiling joists along your planned track path. If joists don’t align with your door placement, you’ll need to install blocking between joists or add a solid mounting board. Never attach barn door hardware only to drywall.
For drywall ceilings without accessible joists, consider installing a sturdy header board across multiple joists first. This distributes the weight evenly and provides a solid mounting surface for your ceiling-mount barn door hardware.
Design Styles: Modern, Rustic, and More
Modern designs feature clean lines with flat-panel doors in neutral colors like white, gray, or black. Pair these with brushed nickel or matte black hardware for a sleek look.
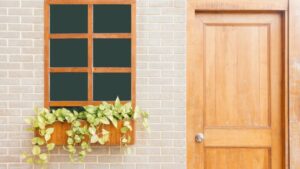
Rustic styles use natural wood doors with visible grain, often in X-brace or Z-brace patterns. Bronze or black metal finishes complement this farmhouse aesthetic.
Industrial designs combine raw materials like metal-clad doors or reclaimed wood with exposed black hardware. Glass doors with metal frames work well for maintaining light flow while dividing spaces. Choose frosted or clear glass based on your privacy needs.
Tips, Maintenance, and Safety for Ceiling-Mounted Barn Doors
Your ceiling-mounted barn door divider needs regular care to work safely and smoothly. Simple maintenance keeps the hardware working well, and following safety guidelines protects your home and family.
Keeping Your Barn Door Divider Running Smoothly
Clean your track and floor guide every few months by wiping away dust with a soft cloth. This helps your door glide easily without catching.
Check all screws on your ceiling mount barn door hardware kit once a month. Tighten any loose bolts, especially where the track connects to the ceiling. A loose connection can cause problems over time.
If your door starts to squeak, add a tiny bit of silicone-based lubricant to the rollers. Don’t use too much, as this attracts dust.
Safety Guidelines for Overhead Installations
Your track must attach directly to ceiling joists, not just drywall. Use a stud finder to locate solid wood supports before drilling. Drywall alone can’t hold the weight.
Install your floor guide correctly to prevent the door from swinging out. This small piece keeps everything stable and safe.
If your door weighs more than 100 pounds or you’re unsure about your ceiling structure, hire a professional installer.
Contact Us: Discover the Tengyu Difference
Tengyu is a global leader in architectural hardware and door systems, offering professional-grade solutions for both residential and commercial spaces. Explore our extensive Product Catalog to find the right hardware for your ceiling-mounted project.
Featured Tengyu Solutions for Room Dividers
For those seeking a high-end, modern look for their ceiling-mounted room divider, we recommend our specialized metal and glass collections:
- Premium Sliding Glass Systems:
- Modern Barn Door with 3-Lite Glass and Hardware: This industrial-style door features a robust steel frame and tempered glass, perfect for modern partitions.
- 1-Lite Tempered Glass Barn Door with Black Steel Frame: A minimalist option that maximizes visibility and light.
- Double Steel Framed Sliding Glass Barn Door Set: Ideal for larger room divisions requiring a bypass or bifold configuration.
- Specialty Hardware & Doors:
- 48-Inch Space-Saving Arch Design Closet Door: A unique architectural choice for stylish storage or room separation.
- Frameless Sliding Glass Interior Door with Concealed Rail: For a “floating” glass look with minimal visible hardware.
Our team specializes in bulk orders and custom sizing for architects, contractors, and homeowners. Request a Quote Today and let us help you design a beautiful and functional space.
Frequently Asked Questions
What hardware do I need for a ceiling mount?