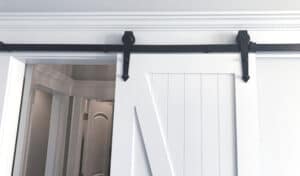
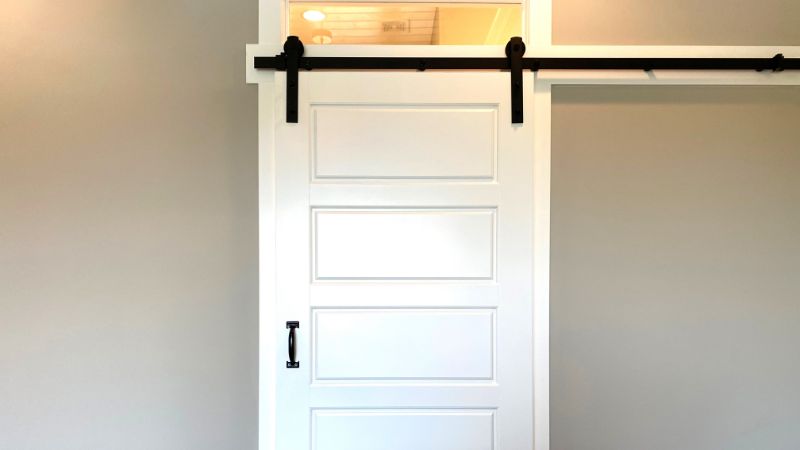
A header board is the critical structural component that provides the mounting surface and support needed for barn door track hardware. Without it, even well-designed barn doors can become unstable, operate poorly, or present safety hazards.
What Is a Barn Door Header Board?
A barn door header board is a thick plank of wood mounted above the door opening to support the sliding track. It spreads out the door’s weight across several wall studs, which keeps things from sagging or pulling loose over time.
Purpose of a Header Board
The point of a header board is to give you a solid, secure spot to attach the barn door track. If you skip it, the track can sag or even pull away from the wall, especially once the door is moving.
Instead of putting all the force on just a couple of screws, the header board lets you distribute the load over several studs. That keeps your drywall from cracking and helps the door run smoothly.
It also makes sure the track is installed on a flat, level surface. Most walls aren’t perfectly straight, so the header helps even things out.
Key benefits include:
- Prevents track sagging
- Spreads weight evenly
- Improves door stability
- Gives a professional look
Components of a Header Board
Usually, a header board is a solid wood plank—think 2×8 or 2×10. The length sticks out past the door opening so there’s room for the whole track and a little extra.
People tend to use pine, oak, or maple, but really, any straight, sturdy wood will do. Just steer clear of anything warped or filled with knots.
Standard specifications:
| Component | Typical Size |
| Thickness | 1.5-2 inches |
| Height | 7.25-9.25 inches |
| Length | Track length + 6 inches |
You’ll need heavy-duty screws or bolts that go right into the wall studs. Make sure they’re long enough to really bite into the framing.
Barn Door Hardware Requirements
The header board has to handle both the weight of the door and the force from opening and closing. Standard barn doors? They’re usually 75-150 pounds, so you need something solid.
Track brackets get attached straight to the header using chunky screws. The board’s thickness helps keep the fasteners from splitting the wood or pulling out.
Essential hardware includes:
- Track mounting brackets
- Heavy-duty wood screws (3-4 inches)
- Wall anchors for stud attachment
- Level and measuring tools
The board should be just a hair thicker than your door’s trim—at least 1/8 inch more. That way, the door clears any molding and doesn’t get stuck.
Make sure you’re hitting at least three wall studs when you install. That’s the sweet spot for keeping everything secure and wobble-free.
Why You Need a Header Board for Barn Doors
A header board is essential for a safe, stable, and smooth-operating barn door. It works by distributing the door’s weight and providing a solid surface for the track hardware.
Key reasons you need a header board include:
- Structural Support: It spreads the significant weight of a barn door (often 50-150+ lbs) across multiple wall studs, preventing sagging and ensuring a secure installation.
- Wall Protection: It provides a solid mounting surface, eliminating the need to cut into drywall and preventing cracks or damage caused by the door’s movement.
- Smooth Operation: A level header guarantees the track is straight, allowing the door to slide effortlessly and reducing wear on the hardware.
Measuring and Sizing Your Header Board
The header board needs to be big enough to support everything and let the door move freely. You’ll want to factor in door weight, opening width, and the hardware you’re using.
Sizing Your Header Board
Length: The board should reach past the opening so the door can slide all the way open. Single doors usually need a header at least twice the door width, plus an extra 6 inches for good measure.
Thickness: Most folks use 3/4 inch if the trim is 5/8 inch, but if your door is heavy, you might want 1.5 inches. Width-wise, 6 to 8 inches is pretty standard for a solid mounting surface.
Weight: For heavier doors (over 150 pounds), use a thicker header (at least 2 inches) to ensure it can handle the load without bowing.
Common Header Board Dimensions:
- Length: 2x door width + 6 inches (minimum)
- Thickness: 3/4″ to 1.5″
- Width: 6″ to 8″
Positioning the Header Board
- Placement: Mount the header level and flush against the wall, ensuring it is screwed directly into the wall studs for maximum support. Use shims to correct for any unevenness in the wall.
- Clearance: Leave 8-10 inches of space above the door to ensure it operates smoothly without obstruction.
Selecting Materials for Your Header Board
Your choice of header board material impacts its appearance and durability. Wood is the most common choice, while metal offers a modern or industrial look.
Wood Options
- Hardwoods (Oak, Maple, Hickory): The strongest choice, ideal for heavy doors.
- Pine: A less expensive option suitable for lighter doors.
- Engineered Woods (MDF/Plywood): A budget-friendly choice. MDF is smooth and great for painting, while plywood is better for humid locations.
- Thickness: A 3/4-inch board is standard, but use a thicker board for heavier doors. For a cohesive look, match the wood to your existing trim.
Metal Options
- Steel: Incredibly strong and the best option for very heavy barn doors.
- Aluminum: A lighter, rust-proof alternative that is not as strong as steel.
- Finishing: Powder coating in colors like black or white provides a durable finish.
- Best for: Modern or industrial styles. Use hollow steel tubing for lighter doors and solid steel for heavy-duty needs.
Finishing Choices
- Pre-primed boards: Save you time on prep work before painting.
- Stain: Brings out the natural wood grain.
- Paint: Provides endless color possibilities. A semi-gloss or satin finish is both durable and easy to clean.
- Clear Coat: Protects the wood while letting its natural beauty show through. Polyurethane is a good choice for humid areas.
- Unfinished: Allows for custom finishing to perfectly match your room’s decor.
Of course, here is a more brief version of the installation guide:
Step-by-Step Installation Guide
Properly installing your barn door header board requires the right tools and precise measurements.
1. Gather Your Tools & Supplies
You will need the following items:
- Tools: Cordless drill, a 48-inch level, stud finder, tape measure, and a pencil.
- Materials: Header board, 3-inch wood screws, and sandpaper. Wall anchors are only needed if you cannot secure the board to a stud.
2. Mark Stud Locations
A secure installation depends on accurate marking.
- Find Studs: Use a stud finder to locate and mark the center of each wall stud where the header will be placed.
- Mark Height: Measure and mark the header board’s height, ensuring it’s at least one inch above the door opening for clearance.
- Draw a Line: Use your level to draw a straight horizontal line connecting the stud marks at the correct height.
- Transfer Marks: Transfer the stud locations onto the header board to guide drilling.
3. Mount the Header Board
Work carefully to ensure the board is level and secure.
- Position the Board: Hold the header board against the wall along your marked line.
- Drill Pilot Holes: Pre-drill pilot holes through the header board at each stud mark to prevent the wood from splitting.
- Secure the Board: Partially drive 3-inch screws into the pilot holes to hold the board. Check that it’s still level before fully tightening the screws into the studs.
- Final Check: The board should be completely straight and snug against the wall with no gaps or movement.
Attaching Barn Door Hardware to the Header Board
A properly installed track on the header board ensures your barn door operates smoothly and safely.
1. Secure the Track
- Position and Level: Place the barn door track on the header board and use a level to ensure it’s perfectly straight before marking screw holes.
- Use Proper Hardware: Secure the track with heavy-duty screws (at least 3 inches long) or bolts, placing one every 12-16 inches. Use washers to distribute the pressure.
- Pre-Drill: Drill pilot holes slightly smaller than your screws at each mark to prevent the wood from splitting.
- Attach: Drive the screws through the track and header board directly into the wall studs for maximum stability.
2. Install Spacers and Brackets
- Add Spacers: Install a spacer between the track and the header board at each mounting point. This creates clearance (typically 1-2 inches) so the door doesn’t rub against the wall or trim.
- Attach Brackets:
- Mount the rollers to the top of the door.
- Position the door on the track to mark where the brackets should go.
- Secure the brackets to the door with the included hardware.
- Install Anti-Jump Blocks: Attach anti-jump blocks above the track at both ends of the door’s path to keep it from coming off the rail.
- Final Test: Slide the door back and forth to confirm it moves smoothly without sticking or wobbling before finishing.
Common Mistakes to Avoid When Installing a Header
Getting the barn door header board right comes down to careful measuring, secure mounting, and checking your alignment. Most problems start with one of those three.
- Sizing: The header board must extend at least 6 inches beyond each side of the doorway. Given that barn doors can weigh between 75 and 150 pounds, a sturdy 2×8 or 2×10 board is recommended to prevent sagging.
- Fastening: Secure the header to a minimum of three wall studs using lag screws that are at least 3 inches long. To prevent the wood from splitting, pre-drill pilot holes.
- Alignment: The header must be perfectly level to ensure the door slides smoothly. Use a spirit or laser level to check for and correct any tilt.
Maintenance for Longevity
Regular checks and prompt repairs will extend the life of your barn door header and prevent more significant issues.
- Routine Inspections: Every three months, inspect the header for any signs of stress, such as cracks, warping, or separation from the wall. Also, check for loose screws and any signs of moisture damage or rust.
- Damage Repair: Minor cracks in a wooden header can be filled with wood filler. If you find loose screws, tighten them immediately. For more extensive or structural damage, it is best to consult a professional.
Need Barn Door Suppliers?
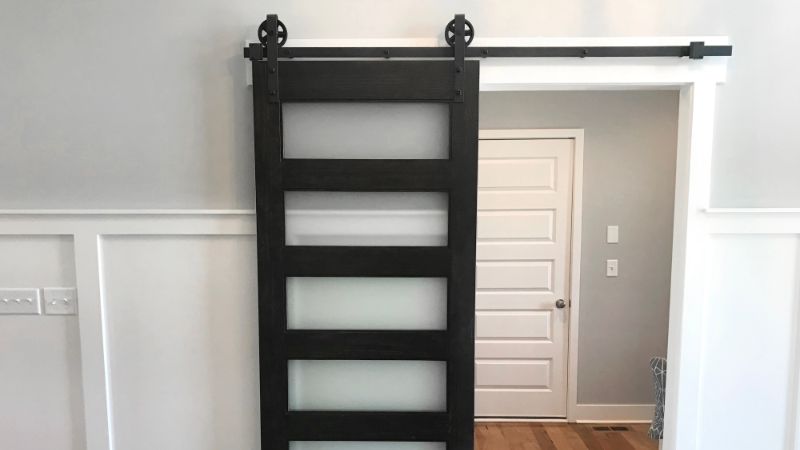
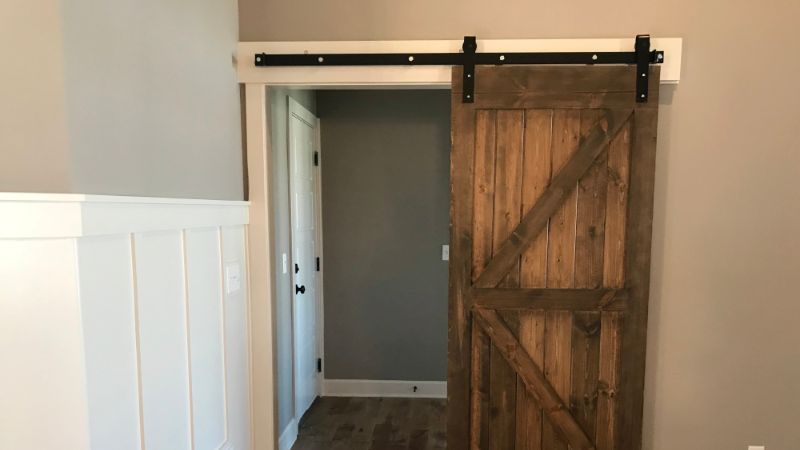
If you need barn door suppliers, contact Tengyu. We offer customization services for a variety of barn door styles including stylish metal-framed glass barn doors with frosted tempered glass, elegant black powder-coated options, and sliding door systems with complete hardware kits.
Any quantity is welcomed. Visit our website and request a quote today to explore our full range of door hardware solutions.